|
Web Lesson #32 Approximate Methods
WL#32 › The Trapezium Rule
The Interactive Web-Lesson below has questions embedded
So do it carefully, as your answers are sent to me!
- When a question pops up, if you want to see the movie again, click ‘ 🅷🅸🅳🅴 ’ (in the top right corner)
- You CAN'T retry a ‘flopped’ question: So PAY ATTENTION and THINK!
- Anytime you click on the © 2022 Math'scool you'll skip back to the previous section...
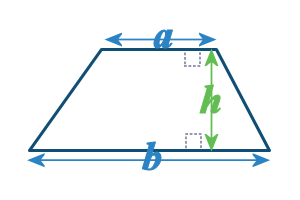
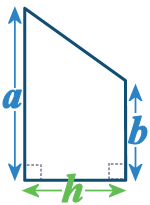
Area of a Trapezium
A trapezium (plural is 'trapezia') is a shape with two parallel sides. A ‘right-trapezium’ has two right-angles - which means that one of the sides is also the perpendicular distance between the parallel sides; so it is even easier to find its area
We call the lengths of these parallel sides ‘a’ and ‘b’
and we call the perpendicular distance between them ‘h’
Then, the area is the trapezium is given by:
\(A=\frac{1}{2}\color{#62be53}{h}\left( \color{#2b83c3}{a}+\color{#2b83c3}{b} \right) \)
The Trapezium Rule:
The Trapezium Rule is an approximate method for finding the area under a curve, that makes use of how easy it is to find the area of a ‘right-trapezium’
The ‘interactive-animation’ explained how the area of a single trapezium is calculated, and how the area under a curve can be split up into multiple (right-) trapezia in order to approximate the area. This example further explains that same concept:
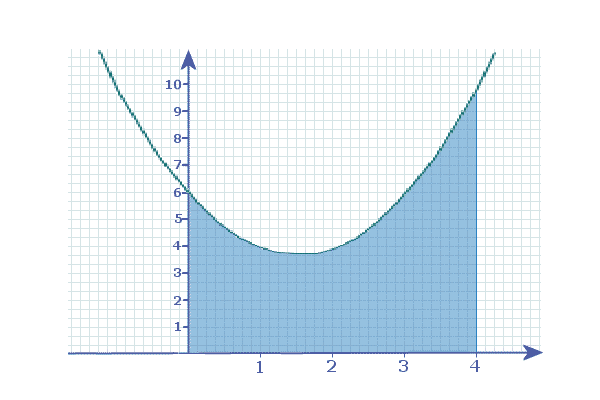
Example 1: Find (approximately)
the area under the curve
\(y=x^2-3x+6\)
between \(x=0\) and \(x=4\)
(as shown on the right)
Decide if your estimate is an
over-estimate or an under-estimate
- Start by dividing up the area required into vertical strips (or trapezia)
- Usually, the question will tell us how many strips we need. In this case I have used 4 strips (which means we have 5 vertical lines - called ordinates)
- If the question doesn’t say how many strips/ordinates to use, then look to see what seems most reasonable and obvious - generally speaking, we want between 4 and 8 strips
For instance, if we want the area from x=3 to x=10, then 7 strips (each of width 1 unit) makes sense. Or, if we want the area from x=1.2 to x=2.4, then, then 6 strips of width 0.2 units makes sense
- The area of any one of the trapezia is given by:
\(A=\frac{1}{2}\color{#62be53}{h}\left( \color{#2b83c3}{{y}_{0}}+\color{#2b83c3}{{y}_{1}} \right) \)
Where ‘h’ = width of strip
‘y0’ = y-coordinate of left-side of strip
‘y1’ = y-coordinate of right-side of strip
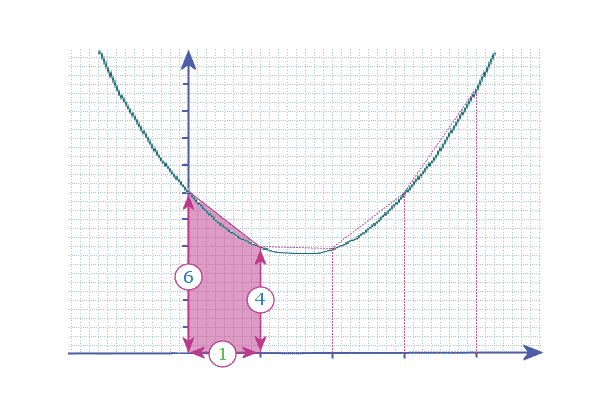
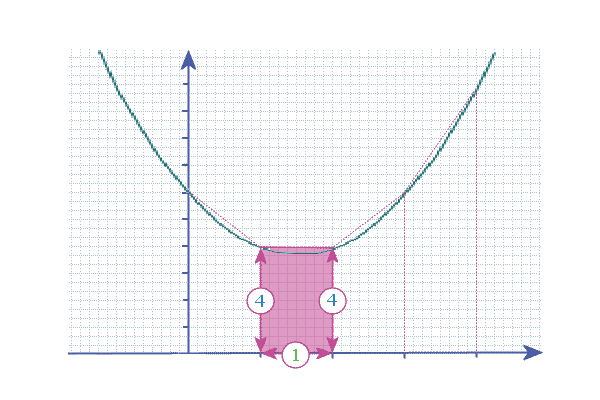
To find the area of the 1st of my trapezia,
I'll use the equation of the curve:
           y	=  x²  - 3x  +  6

When x=0:  y	= (0)² - 3(0) + 6
           y0	=  6

When x=1:  y	= (1)² - 3(1) + 6
           y1	=  4

So:

Area of 1st strip = ½(1)(6 + 4)
                  = 5 units²
Next, let's find the area of my 2nd trapezia:
When x=1:  y	= (1)² - 3(1) + 6
           y0	=  4

When x=2:  y	= (2)² - 3(2) + 6
           y1	=  4

So:

Area of 2nd strip = ½(1)(4 + 4)
                  = 4 units²
Now, let's find the area of my 3rd trapezia:
When x=2:  y	= (2)² - 3(2) + 6
           y0	=  4

When x=3:  y	= (3)² - 3(3) + 6
           y1	= 6

So:

Area of 3rd strip = ½(1)(4 + 6)
                  = 5 units²
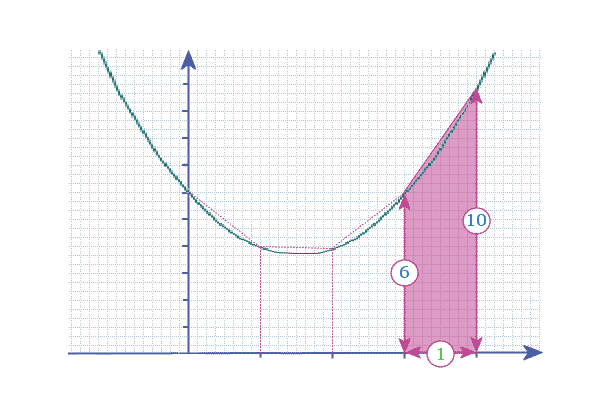
Finally, the 4th (and last) of my trapezia:
When x=3:  y	= (3)² - 3(3) + 6
           y0	= 6

When x=4:  y	= (4)² - 3(4) + 6
           y1	= 10

So:

Area of 4th strip = ½(1)(6 + 10)
                  = 8 units²
- When the areas of all these trapezia are added up they give a total area of 22 units² - which is our estimate of the area under the curve
- Note: There's a different method (integration) that allows us to find the area under the curve exactly. But before you get too excited, there are many curves that integration can't deal with; so we need the Trapezium Rule
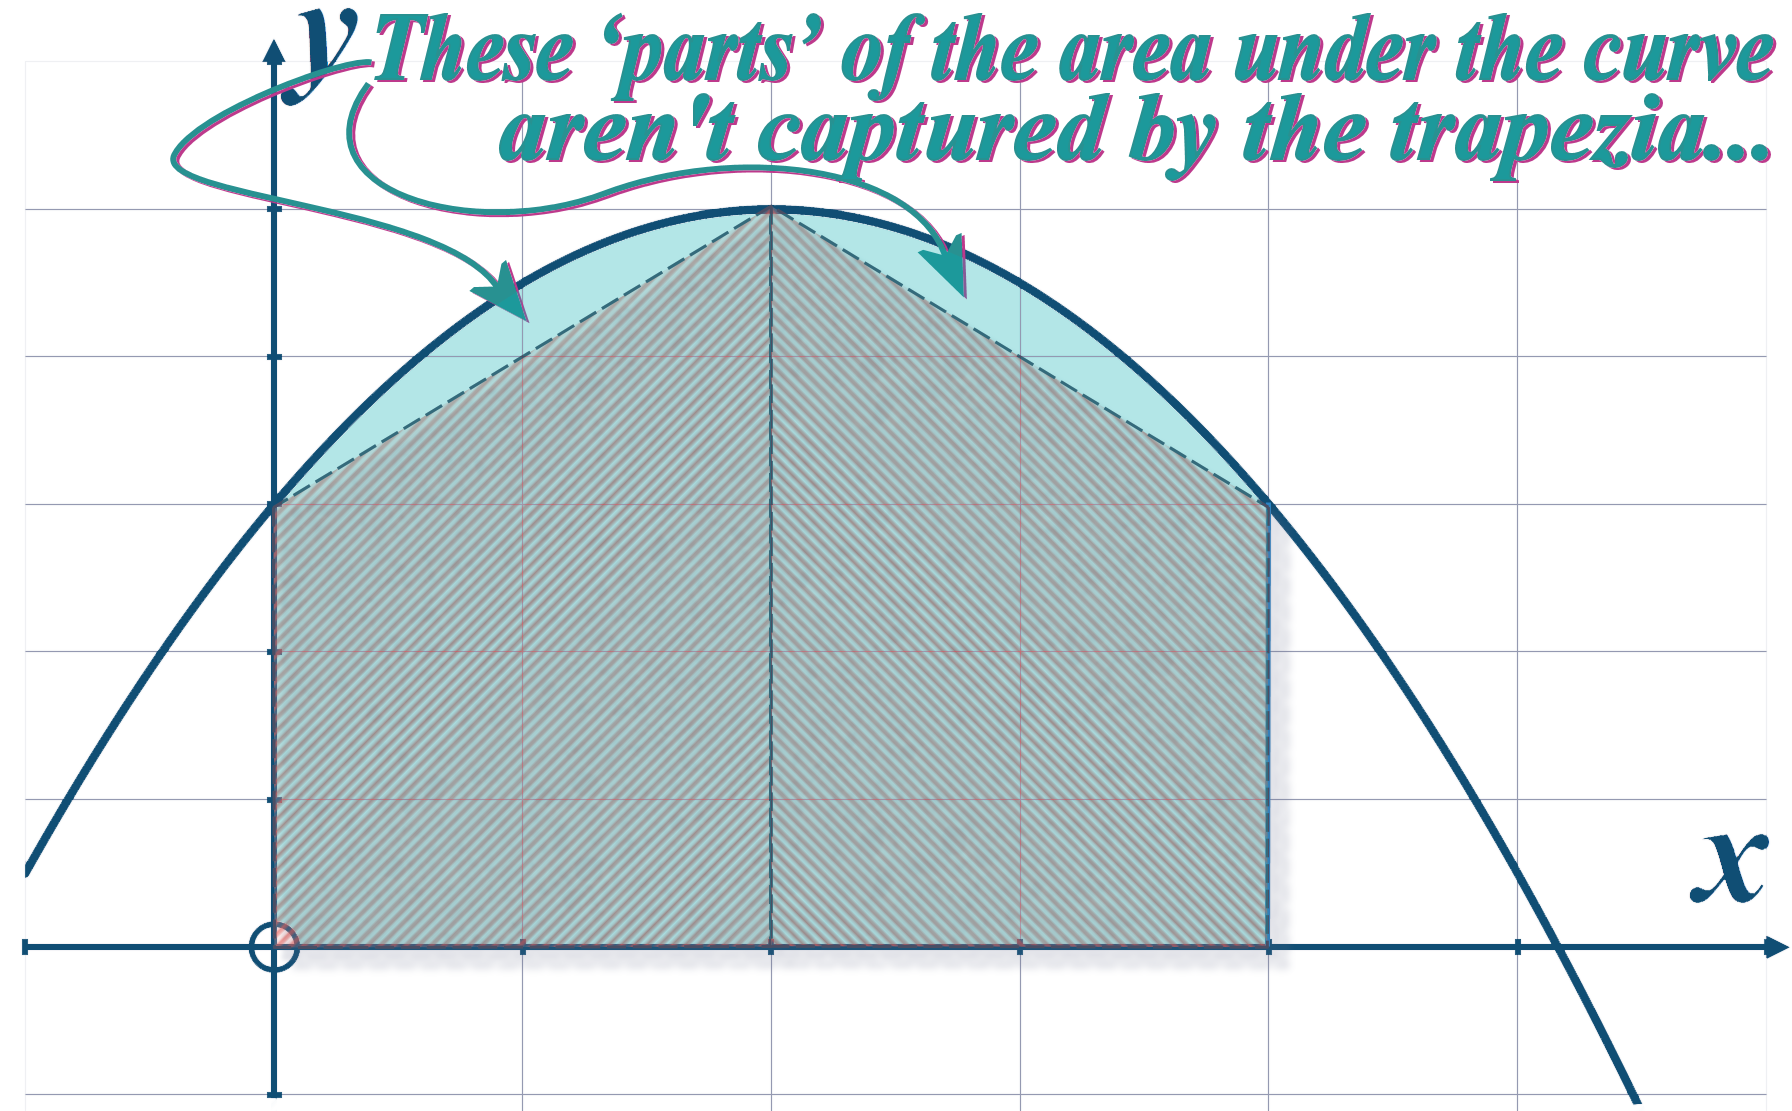
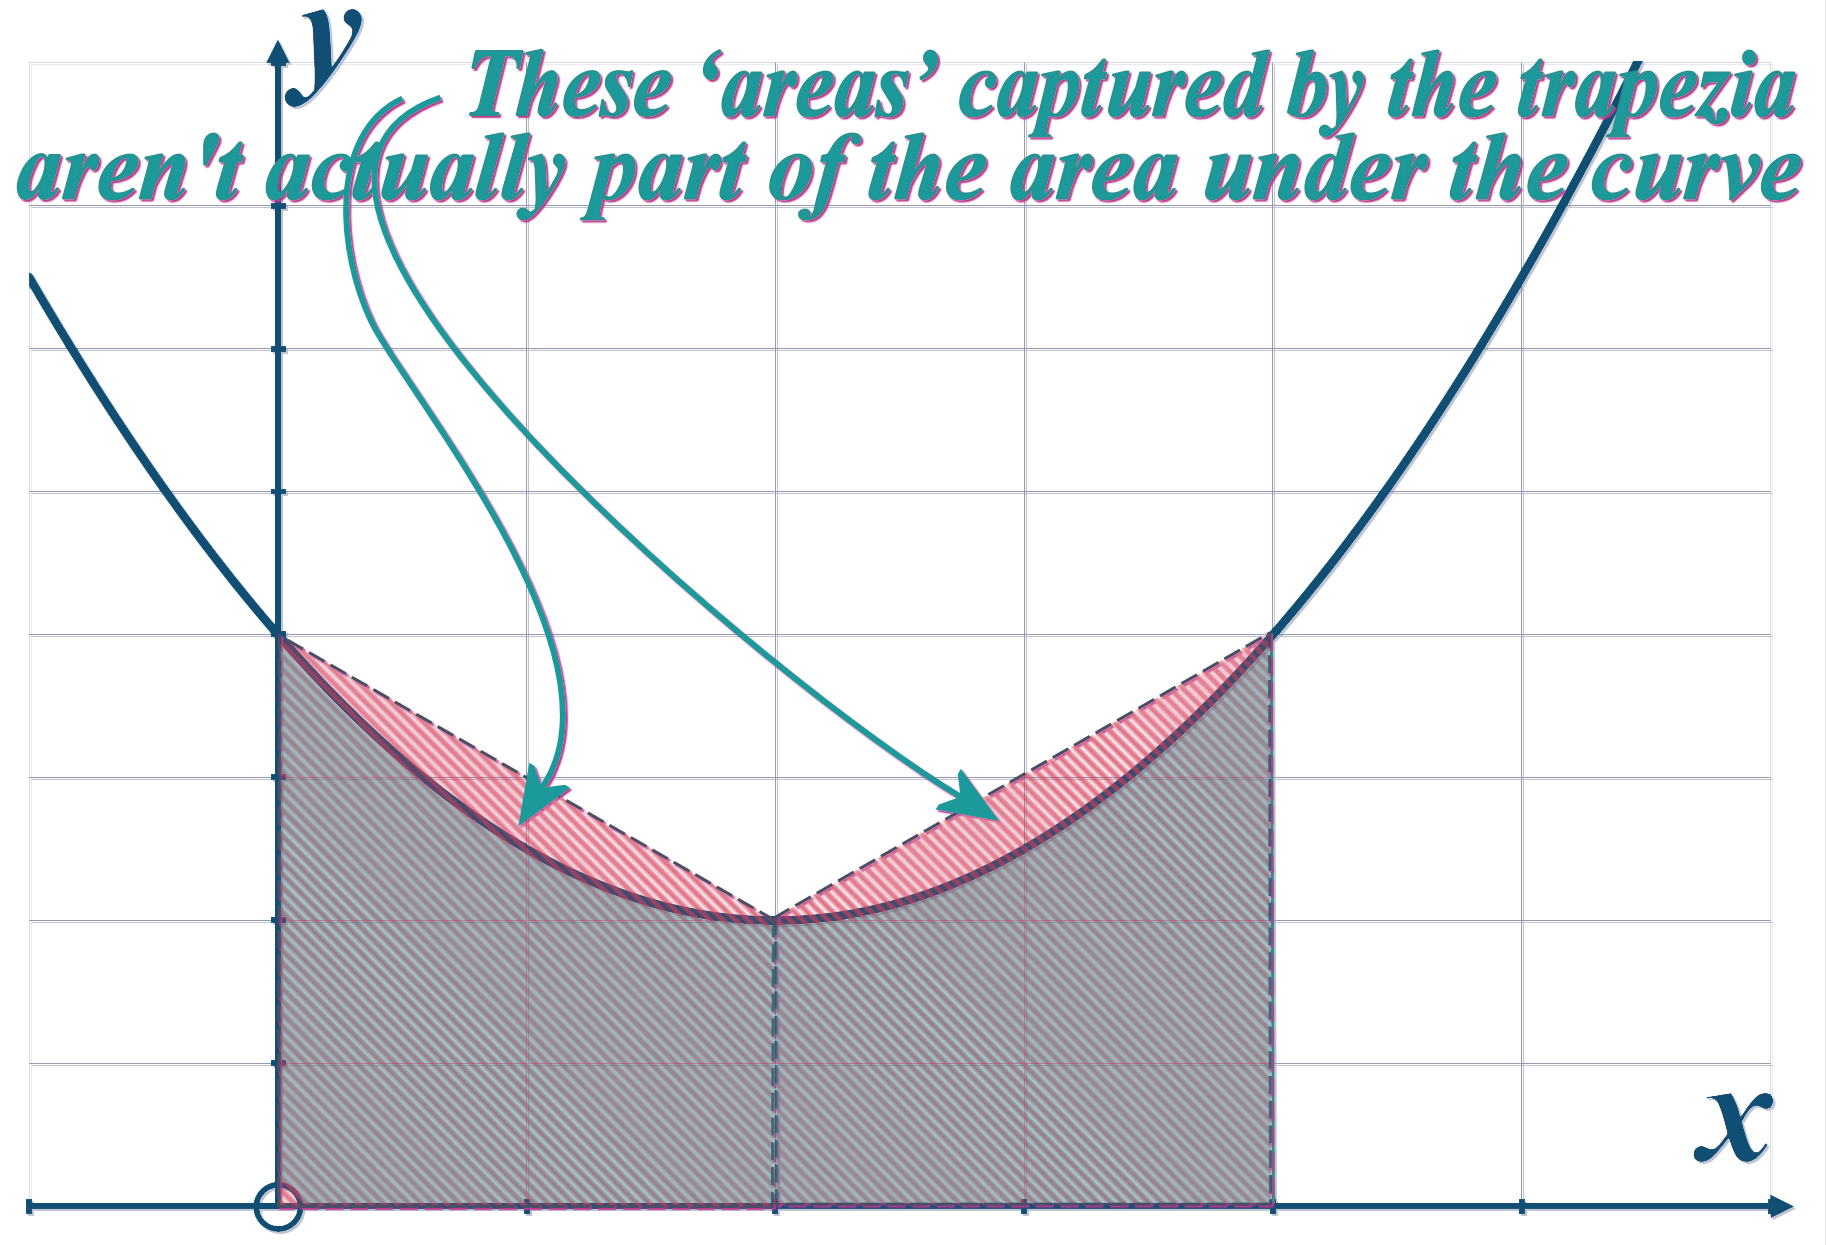
Note: The trapezium rule assumes that each strip is a trapezium; i.e. connecting the tops of each ordinate using straight lines
Concave Down (Concave)
That means if a curve is concave then the trapezium rule will underestimate the area:
Underestimate
Concave Up (Convex)
Whereas if a curve is convex then the trapezium rule will overestimate the area:
Overestimate
We used the Trapezium Rule to approximate the area under \(y=x^2-3x+6\) between \(x=0\) and \(x=4\)
But there's a different method that lets us find the exact area: INTEGRATION (a method used in A level maths):
Usimg INTEGRATION, gives the exact area as: \(21\small{\frac{1}{3}}\) units²
So the approximate method has an error of: \(\frac{2}{3}\) units²
Which equates to percentage error of:
\(\text{Percentage Error}\,=\frac{\color{#00ADB1}{\text{absolute error}}}{\color{#e54239}{\text{exact-value}}}\,\times 100\% =\,\frac{\color{#00ADB1}{\frac{2}{3}}}{\color{#e54239}{\frac{64}{3}}}\,\times 100\% =\,\color{#d28a0a}{3.125\%}\)
The accuracy of the approximation given by this method can be improved by using more strips
For instance, instead of using 4 strips, we could have used 8 strips (each of width ½ unit)
In that case, the percentage error would be 0.78125%. You can check this easily for yourself...
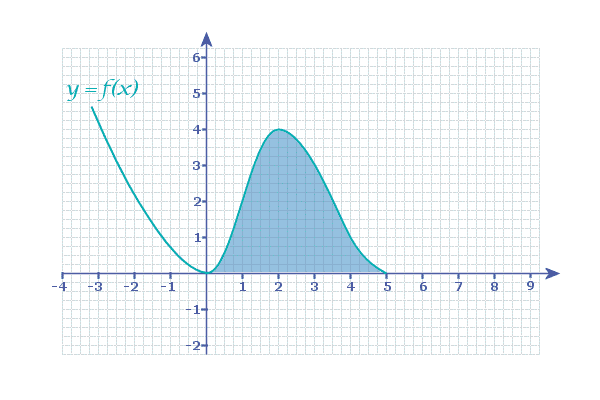
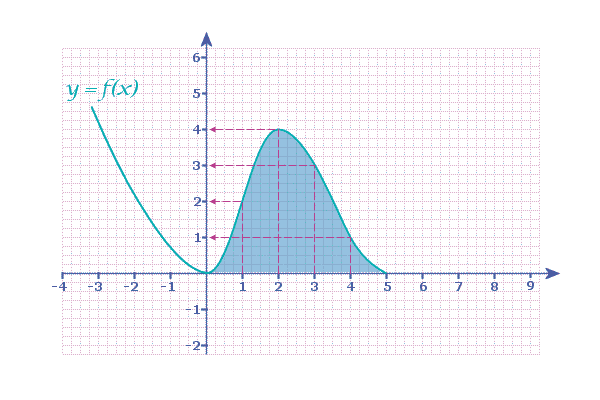
Question 1: A sketch of \(y=f\left( x \right) \) is shown. You can download a high-res image of the graph here
The area under the curve, between \(x=0\) and \(x=5\) is shaded on the graph
a) Use the trapezium rule, with 5 strips, to estimate
the shaded area
The exact area was found; it's 10.145075 (to 8 s.f.)
b) State the accuracy (in significant figures) to which the trapezium approximation should be given
c) State whether the trapezium rule over-estimates, or under-estimates the area
(why would that have been tricky to know, if the ‘exact’ area hadn't been give to us…)
Hints:
Although we aren't
given the equation
for f(x), it is
fairly easy to
read the y-values
from the graph:
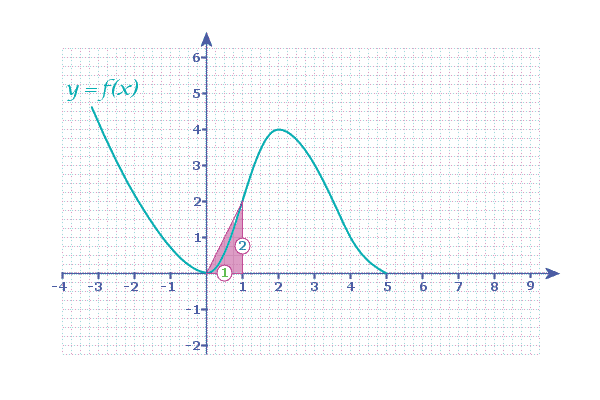
So, starting with the 1st strip:

┌─►Area = ½ × base × ht
│
│	     = ½ × (1)  × (2)
│
│	     = 1 units²
│
│ ┌───────────────────────────────────────┐
└─┤ I used the ‘area-of-triangle’ formula	│
  │ I could've used the trapezium formula	│
  │         Area = ½ h [ y₀ + y₁ ]       	│
  │              = ½(1)[(0) + (2)]       	│
  │                 =   1 units²         	│
  └──────────────────────▲─────▲──────────┘
                         │     │            ┌─────────────────────────────────────────────────┐
                         └─────┴────────────┤ NOTE: I replaced ‘a’ and ‘b’ with ‘y₀’ and ‘y₁’	│
                                            │       which makes sense, as they are y-values!!	│
                                            └─────────────────────────────────────────────────┘
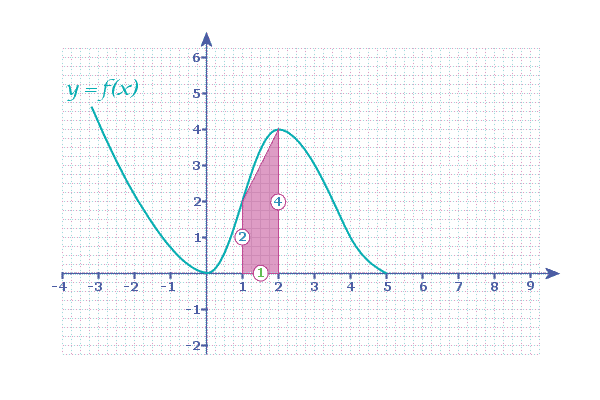
Moving on to the 2nd strip:

        Area = ½ h [ y₁	+  y₂	]

             = ½(1)[(2) + (4)	]

             =   3 units²
And the 3rd strip:                Area = ½ h [ y₂	+ y₃ ]

                                       = ½(1)[(4) + (…)]

                                       =   … units²

And the 4th Strip:                Area = ½ h [ y₃	+ y₄ ]

                                       = ½(1)[(…) + (…)]

                                       =   … units²

And the 5th Strip:                Area = ½ h [ y₄	+ y₅ ]

                                       = ½(1)[(1) + (0)]

                                       =   ½ units²


So, the estimate for the total area is:

                Area  ≈ 1 units² +  … units²  +  … units²  +  ½ units²
                       └──────────────────────┬───────────────────────┘
                                            ┌─┴─┐
                      ≈                      ... units²
Speeding up the Calculation
Let's look again at the area we wanted to find in Example 1:
Example 1 (again): Find (approximately) the area under the curve \(y=x^2-3x+6\) between \(x=0\) and \(x=4\)...
...but this time, find the answer using a single calculation
When we worked out the area, we kept performing the same calculation over and over again...
There is a slightly quicker method of performing the calculation in 1 go:
The quicker way (when we have quite a lot of strips) is to use this formula:
\[Area=\frac{1}{2}h \left( \underbrace{\color{#146496}{y_0}}_{1^{st}}+\overset{\color{#e54239}{⭭}}{\color{#e54239}{2}}\color{#146496}{y_1}+\overset{\color{#e54239}{⭭}}{\color{#e54239}{2}}\color{#146496}{y_2}+\overset{\color{#e54239}{⭭}}{\color{#e54239}{2}}\color{#146496}{y_…}+\underbrace{\color{#146496}{y_n}}_{last} \right) \]
(notice the first and the last y-values aren't doubled; but the rest are...)
Where ‘h’ = width of strip
‘y0’ = y-coordinate of left side of first strip
‘y1’ = y-coordinate of right side of first strip
‘y2’ = y-coordinate of right side of second strip
‘y3’ = y-coordinate of right side of third strip …
Etc.........
‘yn’ = y-coordinate of right side of last strip …
In this case, we could use a table to find the values of y0, y1, y2, ...
Start as before, by dividing up the area required into vertical strips (or trapezia) - as you can see with these pink lines on the graph
So the area would then be:
A = ½ (1)[(6) + 2(4) + 2(4) + 2(6) + (10)]
= 22 units²
That's Soooo much quicker, innit blud?
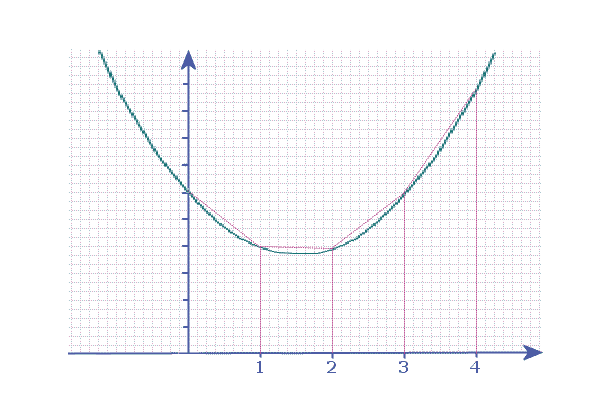
Question 2: In Example 2, we estimated the area under \(y=x^2-3x+6\) between \(x=0\) and \(x=4\),
using 4-strips
A more accurate estimate of the area can be found by using more strips
a) Complete this table for the equation \(y=x^2-3x+6\)
x y
0 6
0.5 4.75
1 4
1.5 ………
2 ………
2.5 ………
3 ………
3.5 ………
4 10
b) Using the trapezium rule with 9 ordinates (i.e. 8 strips), approximate the area under the curve \(y=x^2-3x+6\) between \(x=0\) and \(x=4\)
c) Comment on the difference between your answer and the answer from Example 1 (which was 22 units²)
Hints:
You should have no problem completing the table...

          ┌─── h ───┐
          ▼         ▼
 x  │     0        0.5        1        1.5        2        2.5         3        3.5        4
────┼────────────────────────────────────────────────────────────────────────────────────────
 y  │     6        4.75       4        ...        4        4.75       ...       ...        10
          ▲         ▲         ▲
          │         │         │
          y0	      y1	      y2      etc…

Using the "QUICK" trapezium rule method:

          ┌────────── Since there are 9 y-values in our table: i.e. 9 ordinates ─────────┐
A =  ½ h [ y0	 +   2y1   +   2y2	   +   2y3	 +   2y4	 +   2y5	 +   2y6	 +  2y7	 +  y8]

A =  ½(½)[(6)  + 2(4.75) + 2(4)    +  2(…)   +  2(4)   + 2(4.75) +  2(…)   +  2(…) + (10)]
            ▲     ⭫         ⭫          ⭫         ⭫        ⭫           ⭫        ⭫       	▲
            │   t h e  ‘y’-v a l u e s   h a v e   a l l   b e e n   d o u b l e d      │
            ├───────────────────────────────────────────────────────────────────────────┘
            └──────╢ EXCEPT THE FIRST AND LAST y-VALUES !!!

A = ...... units²
Question 3: In Example 1, we estimated the area under the curve \(y=x^2-3x+6\) between \(x=0\) and \(x=4\) and (since we were told the actual area is 64/3 units²) we also found the percentage error in that estimate
In Question 2, we doubled the number of strips used, to improve the estimate
Confirm that the improved estimate you calculated in Question 2 does result in a lower percentage error
Hints:
In Example 1, we were told that the exact area is 64/3 units² and so we worked out that
the percentage error in THAT estimate was 3.125%

In Question 2, we improved that estimate, so the percentage error should reduce:

Percentage error:    (Estimate from Qu 2) - (64/3)    ×  100%
                                  64/3
Question 4: The table below gives the coordinates of some points on the curve: \(y=g\left( x \right) \)
x y
0 0
1 2.4
2 7.2
3 14.4
4 24
5 36
6 50.4
7 67.2
8 86.4
9 108
10 132
a) Print off this grid and sketch the curve
b) Using 6 ordinates, find an approximation of the area under the curve from \(x=2\) to \(x=7\)
c) Use your sketch to decide if this estimate represents an over-estimate or an under-estimate. Explain your answer.
Hints:
You should have no problem in plotting the points and drawing a smooth curve through the points

We are finding the area between x=2 and x=7

So, we can add vertical lines (ordinates) at x=1, x=2, x=3, x=4, ...

Since the 'gap' between these x-values is '1': h = 1

Using the QUICK trapezium rule method:

Area = ½(1)[ (7.2) + 2(14.4) + 2(...) + 2(...) + 2(...) + (67.2)]

     = ... units²
Question 5: Given that the exact value of the area detailed in Question 4 is 161 units², find the percentage error in your estimate in Question 4
Hints:
We are told the exact area is 161 units²

Our Trapezium Rule estimate of the area is: .... units²

So: Error = ...

Percentage error =   ...   ×  100%   =   ...
                     161
Question 6: This is a table of values of \(y=j\left( x \right) \):
x y
0 2.1
1 4
2 5.2
3 5.85
4 6.15
5 6.35
6 6.85
7 8.15
8 11
9 16.15
10 25
a) Print and use this grid to sketch the part of the curve from \(x=0\) to \(x=10\)
b) Use the Trapezium Rule, with 6 ordinates (i.e. 5 strips) to estimate of the area under the curve between \(x=0\) and \(x=10\)
c) Is is possible to say whether this estimate represents an over-estimate or an under-estimate? Explain.
Hints:
Since the 'gap' between the x values is '5': h = 5

Using the QUICK trapezium rule method:

Area = ½(5)[ (...) + 2(...) + 2(...) + 2(...) + 2(6.15) +  2(6.35) + (6.85) ]

              = ... units²
Question 7: Print off this grid and sketch \(y=x\left( x+3 \right) \left( x-3 \right) \)
b) Use the trapezium rule to estimate the total area contained between \(y=x\left( x+3 \right) \left( x-3 \right) \) and the \(x\)-axis
c) Explain whether this estimate is an over-estimate, or an under-estimate
Hints:
I'm hoping that your sketch shows you that we only need work out 1-side of the area,
because it is symmetrical…

So, we need to work out (say) the area between x=0 and x=3 (and then double it…)

We've got a bit of a choice here, we could use 3 strips, or 6 strips.

I think 3 strips would make our approximate pretty rough, so let's go for 6 strips (7 ordinates):

           x	│  0           ½           1½           2           2½           3
          ────┼──────────────────────────────────────────────────────────────────
           y  │  ……          ……          ……           ……          ……           ……

So the area can be approximated by:
Area =
2×(
½(..)[ (0) + 2(-4⅜) + 2(...) + 2(...) + 2(...) + 2(-6⅞) + (0) ]
)
Question 8: Given that the exact value of the area specified in Question 7 is 40.5 units², determine the percentage error in your estimate in Question 7
Hints:
Exact value = 45/4

Error = ...

Percentage error =      error   × 100%   =   ...
                     exact value
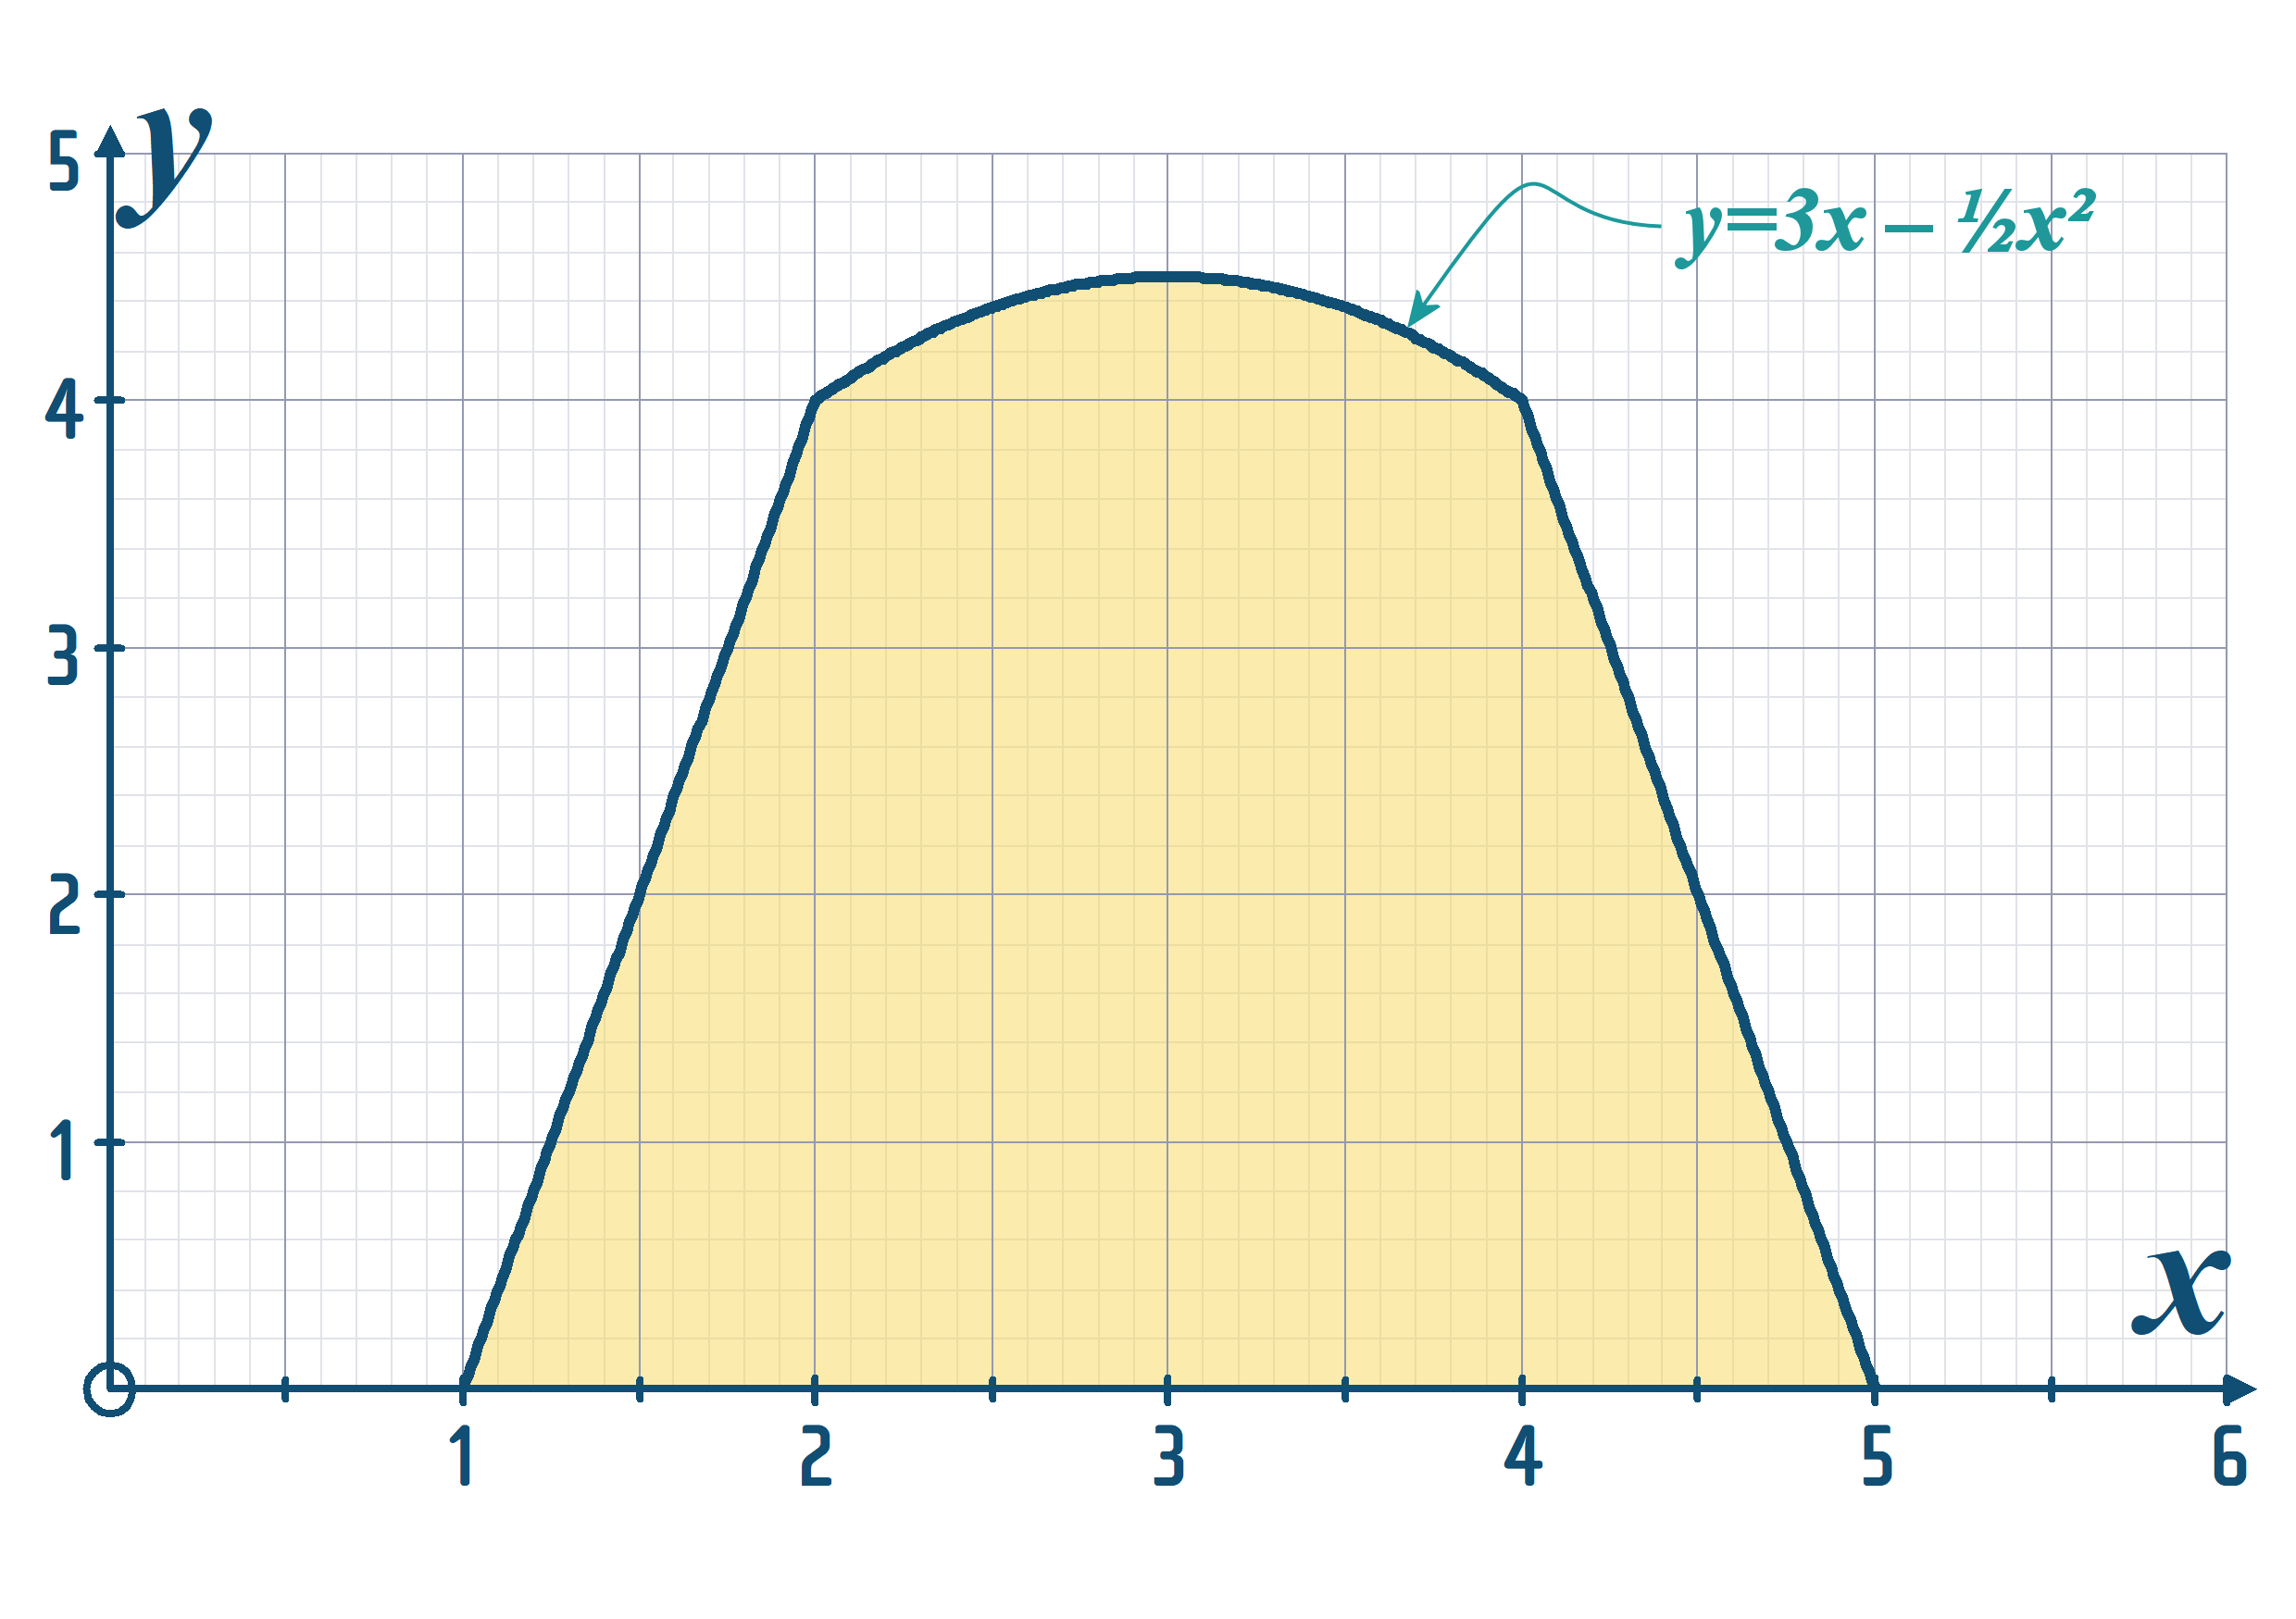
Question 9: The image on the right is of a mine tunnel; the yellow-shaded area representing the ‘opening’. Units on both axes are in metres.
The sides of the tunnel are straight.
The roof follows the curve \(y=3x-\frac{1}{2}x^2\)
By first considering carefully how to apply the Trapezium Rule to this problem, estimate the area of the ‘opening’
Use the trapezium rule to estimate this area and confirm your earlier assertion
b) As a check, add a horizontal line (\(y=4\)) through the ‘opening’, and use the ‘counting-squares’ method (click here) to estimate the area above your horizontal line and add it to the area below the horizontal line to get a second estimate of the ‘opening’
Hints:
So, y = 3x - ½x² ONLY represents the CURVY bit along the top...

                               ...so it makes sense to SPLIT this area up into THREE separate parts

We can use the Trapezium Rule for the middle part (the other ◢ two ◣ are super easy, innit?)

So, for the middle section:

                    ┌——— h ———┐
           x  │     2        ...        ...        ...        4
          ────┼──────────────────────────────────────────────────
           y  │     4        ...        ...        ...       ...

Area = ½(...) [ (4)  +  2(...)  +  2(...)  +  2(...)  +   (4)]
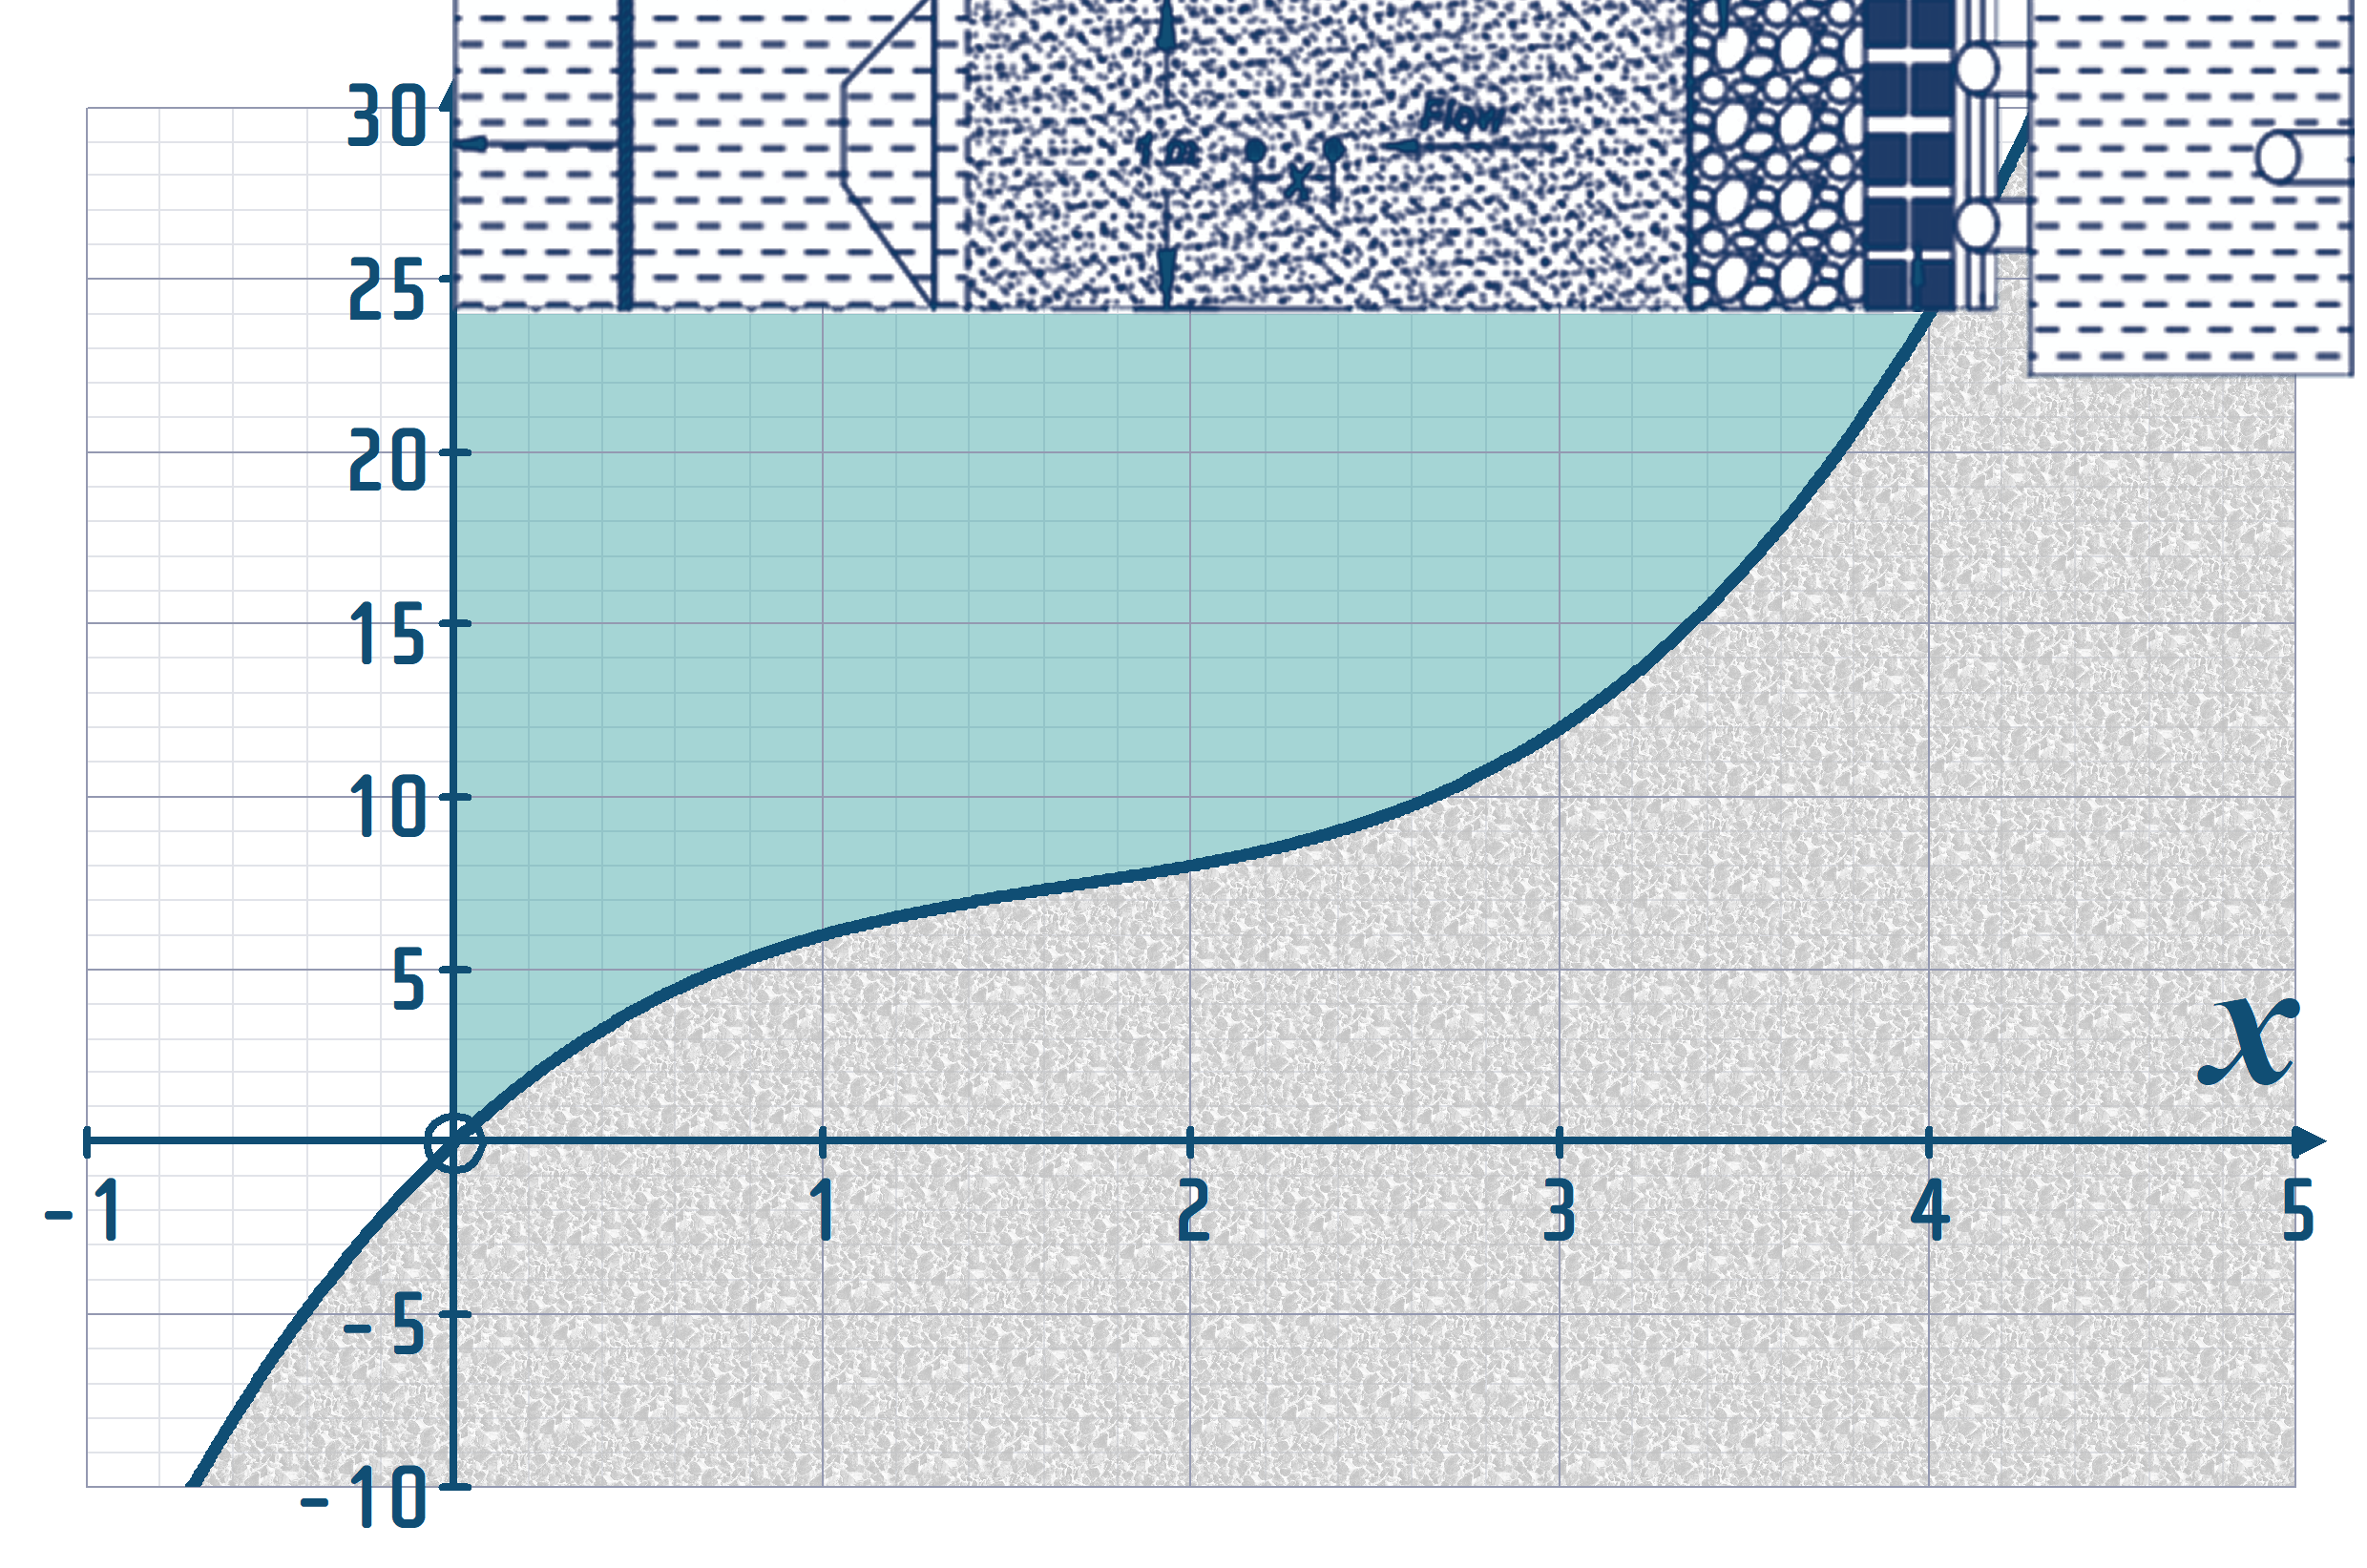
Question 10: The diagram shows part of a coastline leading up to a pier. The area shaded ‘aqua’ is the sea. The coastline is modelled using the curve:
\(y=x^3-5x^2+10x\), from \(x=0\) until \(x=4\)
Use the trapezium rule with 4 strips to estimate the area shaded ‘aqua’
Hints:
Try NOT to to think about working out the aqua area first - think about working out a different area,
that will then allow you to figure out the aqua area

It's actually more similar to all the previous questions than you might think!
Complete this web lesson on separate paper from any other homework
The pass mark (to avoid additional homework on this topic) is: \(\frac{8}{10}\)
Show FULL workings and highlight your answers!!!
|